Documentation
Learn how Polypane improves your workflow
Browser features
Polypane is meant as a tool to help you develop your own web pages, but it also includes many of the "regular" browser features for convenience, like history, suggestions, tabs, permission support and more.
History and suggestions
Polypane keeps a history and will show suggestions in the address bar based on that history. Right click the navigation buttons to get an overview of previous pages. Middle click (or ⌘ + click) any URL in the list to open it in a new tab.
When typing in the address bar, Polypane will match each fragment in the title and url so if you only remember parts of a title or URL, you can enter those space separated and use that to find the right URL. Middle click (or ⌘ + click) any URL to open it in a new tab. Pressing Esc while in the address bar will revert to the current URL.
You can clear the history by going to the Edit menu, then "Clear stored data" and selecting "Clear History".
Searching from the address bar
If the filled in value of the address bar can't be resolved to a URL, then Polypane will open a search in the default search engine.
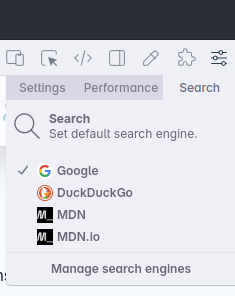
You can change the default search engine by going to the app level settings in the top right of the app and switching to the "search" tab. From there you can also manage search engines.
You can quick search with a specific search engine by prefixing your search with the first or first few letters of a search engine's name. For example, to search on DuckDuckGo, type d followed by your search term. To search on Google, type g followed by your search term. This works for all search engines you've marked as 'active'.
Adding, editing and removing search engines
When managing search engines, you can add search engines with the form. Polypane needs a name, search URL (which we append the search query to), the homepage URL and a favicon URL (which we show in the search selector).
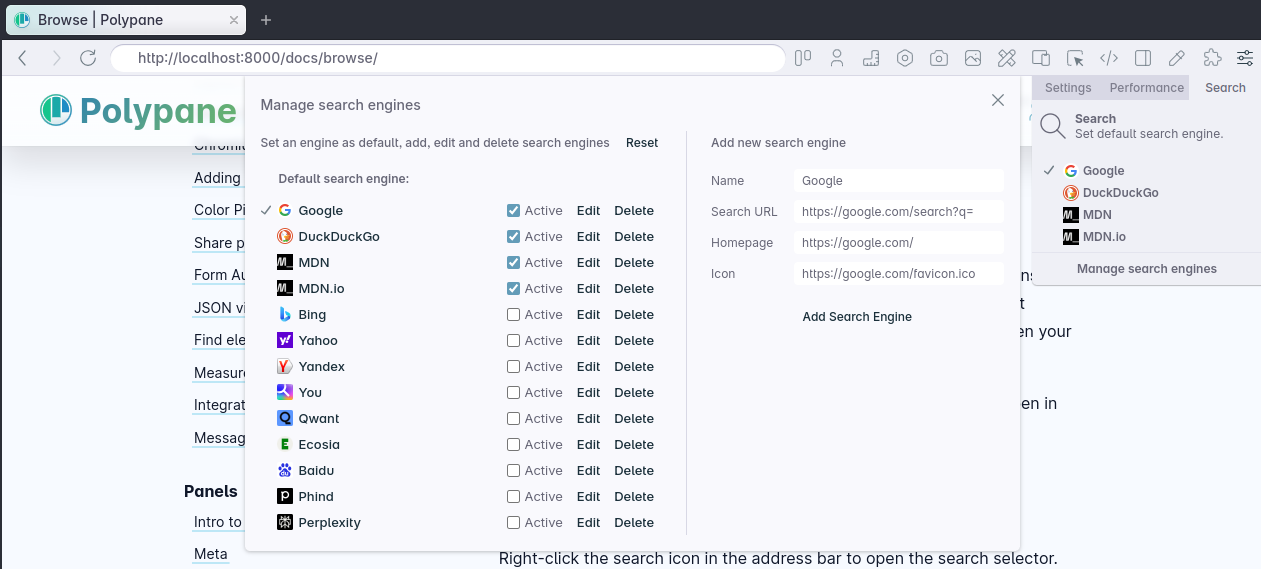
You can use the same form to edit any of the existing search engines, for example to switch Google Search to your preferred language.
If you do not want specific search engines in this list you can opt to delete them. Lastly, the Reset button in the top right resets the search engines to the default list.
Opening web pages
Like other browsers, web pages can be visited by typing or copying their address into the address bar.
Polypane also supports opening URLs and files in a number of different ways.
- You can start Polypane with a URL as the first argument to open that url:
$ polypane https://example.com. Or on MacOs you can use$ open https://example.com -a "Polypane". more about the CLI options - You can drag URLs from other browsers, or HTML files from disk into Polypane to open them. Polypane is also associated with HTML and HTM files as a viewer, so you will find it in the "open with..." menu on right click.
- Lastly, Polypane registers as a HTML viewer on operating systems, so will automatically come up in lists of browsers provided by the OS, and you can even set it as your default browser.
If you're coming from another browser, the easiest way is to use the browser extension for Chrome, Edge and Firefox. Get them on the Downloads page.
Tabs
Interacting with tabs work like you expect in other browsers. Middle clicking or ⌘ + clicking a link will open it in a new tab, and links with target="_blank" will similarly open in a new tab. Alternatively, you can right-click links to open them in the Browse panel.
Right click a tab to duplicate or close it, open the link in a new tab, open the link in the browse panel or copy the link as text or as a Markdown link. From this context menu you can also close all other tabs, close all tabs to the right or left of the current tab or duplicate the tab with a different layout.
Click and drag tabs in the tab bar to re-order them.
You can right-click the + button in the tab bar to select the layout to use. This choice is automatically remembered for new tabs.
To quickly close a tab, middle-mouse click on it. You can also middle-mouse click the tab bar to open a new tab.
Double clicking on the tab bar will maximize or unmaximize the application.
Reopen closed tabs
Use ⇧ ⌘ t or right-click the tab bar and select 'Reopen closed tab' to reopen the last closed tab. We keep the last 20 closed tabs in memory.
Memory usage of tabs
All tabs in Polypane remain active which means you can quickly end up using a lot of memory. Each pane in Polypane has toughly the same memory requirements as a tab in a regular browser so if you have a tab with 4 panes, that's roughly the same as having 4 tabs open in a regular browser.
Instead of opening a new tab to search or look up documentation, you can use the Browse panel to keep the page you're working on visible while looking up something
Sleeping tabs
Tabs you don't need often can be set to sleep when inactive, which will free up memory. You can set a tab to sleep by right-clicking it and selecting "Sleep when inactive". When you focus the tab again, it will wake up and reload the page.
Customizing your new tab setup (changing your "homepage")
By default, the new tab will show three panes with the getting started page shown in them, with a closed panel that opens on the right. But you can edit this by configuring your current tab the way you like, and then go to the "File" menu and click "Set Current Tab as Default new Tab".
The new tab will keep all panes, overlays, the current url, panel, zoom level and other settings, so you can configure it just the way you like it.
Alternatively, you can set a workspace as homepage.
Basic Auth
Polypane supports websites that have HTTP Basic Auth or Digest Auth configured and will show a login popup when the server responds with a basic auth requirement.
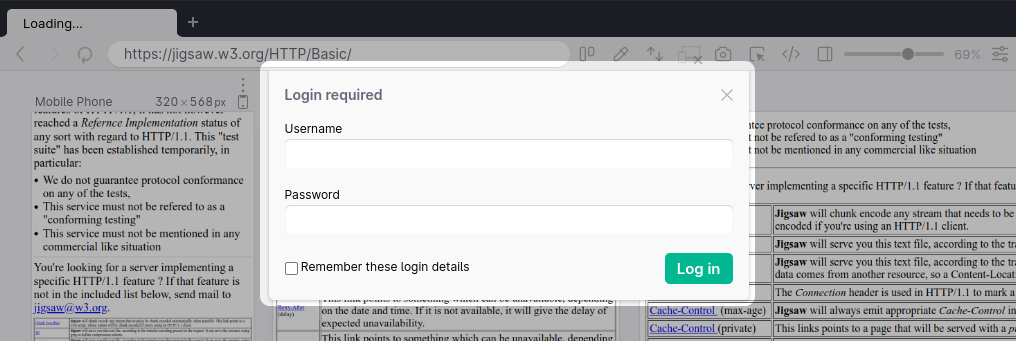
When you fill in the login details for these sites, they will be remembered for the duration of your session. If you want Polypane to remember them permanently, check the "remember this" checkmark. They will be remembered for a specific URL. The username and password will be encrypted and stored only on your computer. To remove them, go to the Edit menu, "Clear Stored Data" and then select "Clear Saved Auths".
Note that Basic Auth is a very simple protocol. If you change the password on your server but don't handle faulty login cases, it will look as if Polypane isn't able to log in. If that's the case, make sure to clear saved auths and try again.
Invalid or self signed certificates
For localhost, Polypane will silently allow self-signed certificates. On any other domain or for any other certificate error (like expired or the wrong host) Polypane will show a dialog showing you the url and the error and ask you if it should still open the page. It will do this once per certificate per session.
Self-signed certificates without using localhost
Some servers, like WPEngine, use self-signed certificates on a ".local" TLD for resources generated by Wordpress in your headless site. For Polypane to allow loading resources from these URLs, you need to add the certificate to your operating system. Follow our guide for that here: WPEngine's Local Development Tool.
Disable Content-Security-Policy (CSP)
To disable CSP, go to the Edit menu and select 'Disable Content-Security-Policy'.
CSP settings on some sites prevent Polypane from injecting scripts needed for different features. When Polypane detects CSP issues it will show you a popup explaining the issue, and you can turn off CSP from there.
You should only disable CSP if you know what you're doing, as it does have security implications.
Allow CORS headers (cross-origin resource sharing)
To allow CORS headers, go to the Edit menu and select 'Allow CORS (Access-Control-Allow-Origin)'. With this feature turned on cross-origin restrictions no longer apply, which could be required for your local development setup when using external APIs with restrictive access controls. It is a safer alternative to disabling web security.
Disable Web Security
To disable web security, go to the Edit menu and select 'Disable Web Security'. With this feature turned on cross-origin restrictions no longer apply, which could be required for your local development setup.
When possible we urge you not to use this feature as disabling web security can have various unintended consequences.
Instead of depending on disabled security measure to allow interation with e.g. a production backend, we urge you to look for better solutions like using a proxy or a staging server, but the feature is there for when there is no other choice.

When web security is disabled, Polypane will show a shield icon in the address bar.
Permission requests
Polypane supports permission requests, like those for location or media access. When a permission is requested, Polypane shows a popup that will let you accept or reject the permission request, and to optionally remember the choice for this url.
To clear saved permissions, select "Clear saved permissions" under "Clear saved data" in the Edit menu.
(geo)location API
To use the location API, you need to add a Google API key with the right permissions. To do this, add a text file called google-api-key (no extension) in the following folder:
- Windows:
%APPDATA%/Polypane/ - macOS:
~/Library/Application Support/Polypane/ - Linux:
~/.config/Polypane/
In the file, add your API key with quotes like so:
"YOUR_KEY_HERE"Any geolocation permission requests made without a Google API key available can only be disallowed or dismissed.
Motion sensors permission
When you use Polypane, you might notice that it asks for permission to use "motion sensors" while Google Chrome does not. That's because Chrome allows access to this sensor by default and won't show a permission request for it. In Polypane, we show popups for all permission requests.
DRM support through Widevine
Note: DRM is not available in 27.0.1 due to an issue with Chromium 142. It will be re-enabled in a future patch release.
Polypane supports DRM through Widevine, which is used by many streaming services like Netflix, Disney+ and Spotify. Widevine is available on all platforms except for Linux on ARM, where it is not supported by Chromium.
Muting sounds
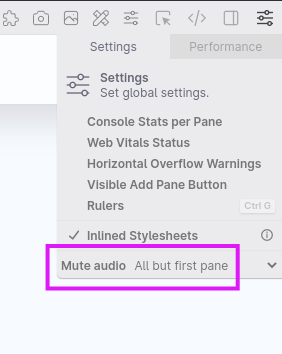
Polypane will allow sound in all panes by default. You can mute all panes or limit sound to just the first pane. To do so open the global settings (the top right button in the header) and select your prefered option under "mute".
Change the color notation
The default color notation in Polypane Peek and the Elements panel is rgb, but you can change it to hex, hsl or hwb in the global settings (the top right button in the header) and select your prefered option under "mute".
Search/find text in page
⌘ f lets you search the page across all panes. All occurences of your search term are highlighted in yellow with the current matched search term in orange. You can also see where on the page matches are found in the scrollbar.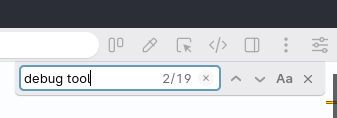
The buttons to the right of the input field let you search backward, search forward and toggle case sensitivity, respectively. While using search focus is locked into the UI so tabbing loops back.
Pressing Esc or the close button clears the UI and search and you can use Enter/⇧ Enter to cycle through all matching occurences.
You can also find elements with CSS Selectors.
Search/find text in page is also available in the Browse panel. When the browse panel is focused, use the same shortcut ⌘ f to open the Find text in page popup and search for text in the current browse panel tab.
Zoom pages in and out
Page zooming is an important part of Accessibility audits, for various WCAG success criteria your page needs to be able to zoom to 200% or to 400%. In Polypane you can zoom pages with ⌘ ⌥ +/-, or with the "Zoom web pages" option in the View menu.
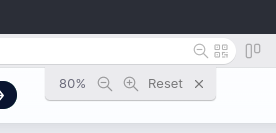
After zooming a page a magnifier with either a plus or minus will be visible in the address bar, and clicking that opens a UI that lets you zoom in, out or reset back to 100% again.
Zoom levels are applied per origin in Chromium, so zooming happens in all panes and will be re-applied next time you open the same website.
Additionally, zoom is not applied to panes that have mobile rendering emulation.
Copy link to highlight
Right-click selected text in any pane and then select "Copy link to highlight" to copy a link that points to the selected text. This link will work in Polypane and other browsers, and will scroll to the selected text when opened.
Managing the UI
You can tweak various aspects of the UI with the following settings:
Hiding the header
To make the most of the available space on your screen, you can choose to hide the header using ⇧ ⌘ h, or by going to the "View" menu and selecting "Toggle Header".
On macOS, this will also hide the traffic lights.
Changing the text size of the UI
If the font in the UI is too small you can zoom the text size in and out by going to the "View" menu and selecting "Adjust Text Size". This will show a popup that lets you resize the text through a slider or by changing the percentage value manually or by using the arrow keys (like other number inputs, holding ⇧/⌘/⌥ will increment or decrement by 10/100/0.1 respectively).
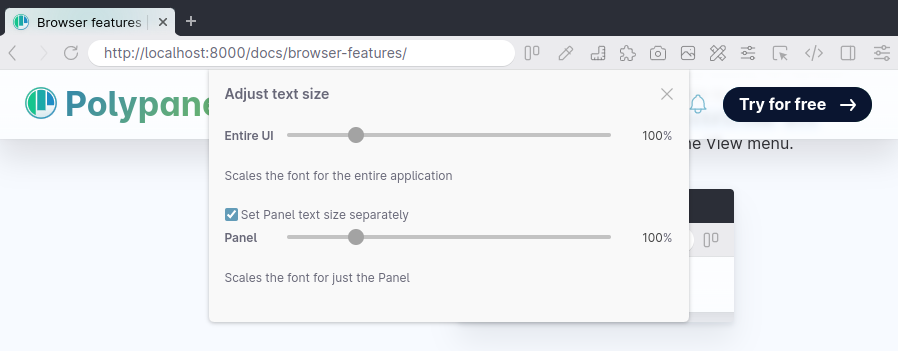
By default the text in the entire UI will be changed, but you can also choose to set the panel text size separately. Click "reset" to revert back to the default font sizes.
Managing the Cache
You can clear the cache or disable it altogether.
Clearing your cache
Polypane adheres to caching rules of websites like other browsers. To clear your cache for a reload, press ⌘ while clicking the reload button, or press ⇧ ⌘ r.
You can also right-click the reload button and select "Empty cache and reload", or use "Empty cache and reload" in the view menu.
Disable Cache
You can disable the cache in Polypane via the Edit menu using the "Disable cache" menu item. You can choose to set it to off, disabled until you restart Polypane, or disabled permanently.
Server cache settings
The Chromium devtools when open will automatically disable your cache, so if you're used to develop in Chrome with the devtools open you might not have noticed that your server sends cache headers.
Polypane doesn't automatically disable cache but instead follows the server settings by default, making it respond more like a regular browser. If you notice caching issues in Polypane, make sure that your development server doesn't send cache headers.
Set a proxy
To use a specific proxy in Polypane, create a file called proxy-settings.json in the following folder to be parsed and applied when you launch Polypane.
- Windows:
%APPDATA%/Polypane/ - macOS:
~/Library/Application Support/Polypane/ - Linux:
~/.config/Polypane/
Then create a JSON object following the Proxy options:
mode(optional) - The proxy mode. Should be one ofdirect,auto_detect,pac_script,fixed_serversorsystem. If it's unspecified, it will be automatically determined based on other specified options.directIn direct mode all connections are created directly, without any proxy involved.auto_detectIn auto_detect mode the proxy configuration is determined by a PAC script that can be downloaded at http://wpad/wpad.dat.pac_scriptIn pac_script mode the proxy configuration is determined by a PAC script that is retrieved from the URL specified in the pacScript. This is the default mode if pacScript is specified.fixed_serversIn fixed_servers mode the proxy configuration is specified in proxyRules. This is the default mode if proxyRules is specified.systemIn system mode the proxy configuration is taken from the operating system. Note that the system mode is different from setting no proxy configuration. In the latter case, Electron falls back to the system settings only if no command-line options influence the proxy configuration.
pacScript(optional) - The URL associated with the PAC file.proxyRules(optional) - Rules indicating which proxies to use.proxyBypassRules(optional) - Rules indicating which URLs should bypass the proxy settings.
For more information about the notation, refer to the Electron documentation.
Disabling overlay scrollbars
Polypane uses overlay scrollbars throughout the app, which disappear when they're not in use. To disable this, create a file called polypane-disable-overlay-scrollbars with the content "true" in the following folder to be parsed and applied when you launch Polypane.
- Windows:
%APPDATA%/Polypane/ - macOS:
~/Library/Application Support/Polypane/ - Linux:
~/.config/Polypane/
Understanding the mental model
Polypane shows your pages in multiple panes at the same time, and this has implications in how it responds as a browsers. To learn more about that, read our docs on the mental model of Polypane's browser contexts.
Have a question about Polypane?
Reach out via (real human) chat, Slack or our contact form:
Contact SupportBuild your next project with Polypane
- Use all features on all plans
- On Mac, Windows and Linux
- 14-day free trial – no credit card needed
